
After seeing so many great Bruyere blouses both in real life and online, I finally decided to make one.

I’m not someone who has the desire to make a button-up blouse. It’s not that I don’t want them – as they’re sorely needed in my wardrobe – but I always seem to be more motivated to sew up a pretty dress instead.
This past fall I hunkered down and stitched one up and I’m oooh sooo glad I did.

This black cotton Bruyere is my wearable muslin – the wearable muslin that gets worn to work quite often! :D
This fabric is in no way forgiving – it’s a basic black shirting that I got at an estate sale that has zero stretch (not even mechanical stretch). As such – the fit would have to be 100% perfect to be wrinkle free. Hence… my fit issues being subtly highlighted by the fabric folds.

This version is very close to being made straight out of the envelope. I have a short waist, and Deer & Doe patterns seem to naturally fit me. The more I work with them, the more I come to love them.
I know I narrowed the shoulders just a hair – but besides that I don’t believe I made any other changes.
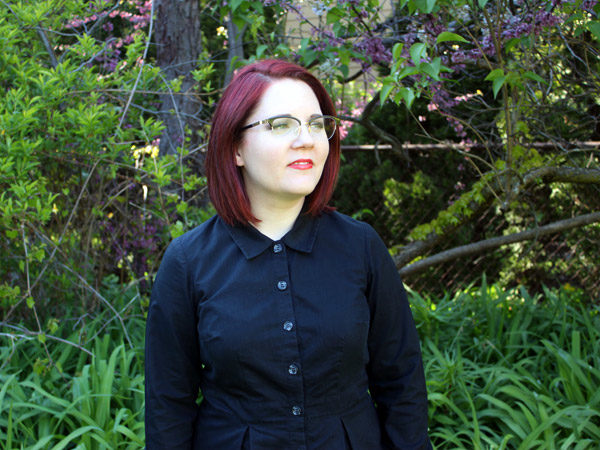
When I look at the above image, I’m seeing:
- An armscye curve or height that isn’t 100% correct for me – folds radiating from the armpit to collar
- Bust darts that could stand to be lowered a hair
- Tucks on the bottom portion that aren’t placed right for me.
Looking at the back view, the fit is pretty good.

I’ve heard it on others’ blogs before, but black really is hard to photograph!!
Either my blouse looks nice and saturated and I look like a ghost or the shirt looks grey and dated and I look a relatively normal shade of pale.

A few less wrinkles in the image above… You can see by having changed my stance/posture I can have fewer wrinkles forming at the armscye.
What doesn’t work for me are the box-pleats on the skirt portion of the blouse front. They really puff out and make me look preggers. On my second version (soon to be posted), I moved the pleats further to either side and I made them point to the side seams so that the front area lays more flat (ie less preggers).

This blouse was my first time sewing in a sleeve placket.


I used my featherweight singer to sew up this blouse. The narrow stitching foot gave me a really nice 1/8″ seam guide which made top stitching these sections a breeze.

While I haven’t gotten on board with making more button-up blouses (Archer & Granville), this Bruyere (and my second one to come soon) was one of my favorite makes from the winter and had a constant place in my wardrobe.
Perhaps when the temperature dips down for fall, I’ll get back on the wagon with blouse sewing. :D
In: Sewing


Fatal error: Uncaught Error: Undefined constant "zilredloh_comments" in /home/avoisio/public_html/zilredloh/wp-content/themes/writsy-child/comments.php:39 Stack trace: #0 /home/avoisio/public_html/zilredloh/wp-includes/comment-template.php(1615): require() #1 /home/avoisio/public_html/zilredloh/wp-content/themes/writsy-child/single.php(40): comments_template() #2 /home/avoisio/public_html/zilredloh/wp-includes/template-loader.php(113): include('/home/avoisio/p...') #3 /home/avoisio/public_html/zilredloh/wp-blog-header.php(19): require_once('/home/avoisio/p...') #4 /home/avoisio/public_html/zilredloh/index.php(17): require('/home/avoisio/p...') #5 {main} thrown in /home/avoisio/public_html/zilredloh/wp-content/themes/writsy-child/comments.php on line 39