
I set out to sew a simple jacket I could wear outside this spring while I’m gardening. I wanted to look granny chic. True to form, I turned a simple jacket into something quite complicated and now I don’t want to get it dirty nor do I want to wear it in the garden. lol

As a forewarning, this post will be very photo heavy. I took a lot of photos of both the inside as well as the outside since this jacket was so labor intensive.

I saw the new-ish release of Simplicity 8298 and I thought it was the perfect, cute pattern to turn into an outdoor jacket for myself while I work in the yard. Great big pockets for tools or seed packets, quilted for warmth, and an easy silhouette perfect for bending and crouching down.

I made a muslin of the jacket in a basic cotton fabric (ie not thick nor quilted), but I made sure to try it on with a long sleeved top I knew I’d wear underneath it. The muslin was pulling in the front near the ‘girls’ so I went and added 1/2 ” of extra width at the underarms on the front bodice only. This makes sense as there is no darts or tucks in the design since it’s quilted.
Before I get ahead of myself… I cut out View A with View C’s long sleeves. But since I’m short – the length of the jacket was somewhere between A and B. I cut out the size S and graded to the M at the waist and hips.
Given the A line shape, I ended up removing extra width in the final jacket from the waist to hip as it was sticking out a lot after I got everything quilted up. So I really should just have cut out a size S for the whole thing. For reference, I’m a 34″ bust, 30″ waist, and 40″ hip.

The pattern states to buy pre-quilted fabric which I was looking around online for. There’s a whole bunch of Nani Iro fabrics that are lovely… but since at the time it was going to be used in the dirt, I couldn’t justify that purchase. So I decided to quilt up my own.

This fabric is a thick, crisp linen I bought from a fellow blogger’s stash busting sale. When I bought it I thought it would make such a lovely wrap dress – but when it arrived that was never going to happen! The fabric has a scratchy feeling and it was awful next to the skin – as in an *ouch* feeling. So this beautiful linen just sat in my stash (for a year).
After I decided to make myself a jacket I started going through my stash to see what fabrics I could use. After thinking this fabric would never make a suitable garment – I turned it into a garment. :D Yay!

This is my very first quilted *anything*. I did a bit of research on methods of quilting specifically tied to garment making.
I went and bought some Quilter’s Dream batting for the insides since I heard that was less resistant to shrinkage in the wash. And for the lining layer I used a flannel-backed satin specifically called Kasha lining. The Kasha is a silvery color that is wind resistant and provides extra warmth for the spring chill. Kasha frays as soon as you cut it so careful handling is key. Also it doesn’t have much give so I wouldn’t recommend using it for a fitting jacket.

My quilted pocket before I applied the bias binding:

This pattern called for pre-made bias binding. While I’m sure this jacket would have benefited from using a contrasting color, I decided to make my own cause I didn’t feel like going out to the store to buy that coarse, scratchy packaged cotton binding.
I used a 1.5″ square pattern on the pockets and stitched it diagonally for some contrast. And for the jacket I have my horizontal lines set every 3″.
It’s hard to see but the inside quilting was done with silver bobbin thread and the outer stitching is a royal blue color.

So I have a secret to tell you and feel free to laugh…. I don’t like quilted garments (nor do I like quilted purses or accessories). LOL This is why I kept my lines on the jacket so wide apart – I didn’t want everything to puff up between the stitching lines. Isn’t that funny?!
I still do love my jacket though and I would easily make another. heh
One thing I love about the jacket is the wide bell sleeves.

I did make a muslin of the jacket and all was good. But once I stitched the whole thing up (ie quilted it) it was sticking out too much at the center back bodice and side seams to be remotely attractive. I was toying around with tucks or taking in the side seams, and ultimately settled on making a belt.

I covered some 1.5″ sturdy elastic with my fabric and cut the fabric longer than the elastic so that it would have that ‘scrunchy’ look to it (ie have positive ease).

When I put the belt on, I manually distribute the extra width to the back. The belt is not super snug, but it gives me a bit of extra shape which helps my small stature.

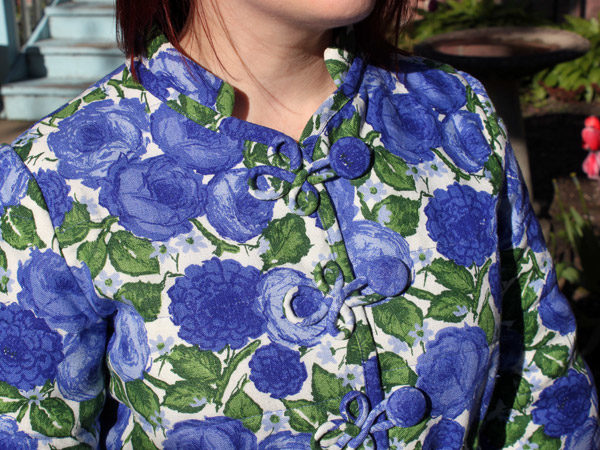
The best feature on my jacket… self-stitched medallion toggles and covered buttons.

You’ll laugh when I say I crafted these up still determined on wearing this out in the garden to get dirty and muddy.
I had to stitch these toggles by hand to form the shape then they were hand stitched directly onto the jacket. Time consuming – yes. Worth every minute/hour.
So… the directions on this pattern have you stitching up the side seams just like you would any other garment. That would have left 6 layers of fabric – including the batting at each side seam not to mention all of that extra fabric at each intersecting seam. That was NOT going to happen on my watch.
I quilted each piece of the jacket individually, but didn’t stitch into the seam allowances. I was hoping this would leave me plenty of room to stitch the outer linen fabric + batting together at the seams, but did not stitch the inside lining. My goal was to trim down the seams, especially the batting, then lap one inside lining over the second to make a nice clean finish. Lastly I would hand stitch it down, since that’s how I roll.

Above, is the inside center back hem. You can see my horizontal quilting did not go all the way to the center back and that there’s a nice clean finish of lining – hand stitched in place.
Inside this seam, the outer + batting pieces are pressed open, the only thing lapped over is the lining piece.
The full inside jacket:

And yes… this sleeve was extremely challenging to stitch and then hand finish.

The collar piece wasn’t staying upright for me so I ended up pick stitching the binding to the collar in order to keep it all upright.


Sleeve:

Inside Pocket:

This deep saturation of blue and green is really the true color of the jacket – its divine and swoon worthy every time I see it. This deep blue is one of my favorite colors, second only to aqua.

Toggles and belt detail:

Since I made a belt, I omitted the button closure right underneath where the belt lands – I didn’t want the extra bulk. So it was fitting to stitch on a medallion piece to the belt itself, so that the front bodice remained symmetrical.
Well… that’s all I have for my garden jacket that is no longer a garden jacket. LOL

I’m so happy that spring has sprung and I can enjoy wearing this transitional coat, even if it isn’t worn while working in the garden. I’ll just have to make another I guess.
Happy sewing!
In: Sewing


Fatal error: Uncaught Error: Undefined constant "zilredloh_comments" in /home/avoisio/public_html/zilredloh/wp-content/themes/writsy-child/comments.php:39 Stack trace: #0 /home/avoisio/public_html/zilredloh/wp-includes/comment-template.php(1615): require() #1 /home/avoisio/public_html/zilredloh/wp-content/themes/writsy-child/single.php(40): comments_template() #2 /home/avoisio/public_html/zilredloh/wp-includes/template-loader.php(113): include('/home/avoisio/p...') #3 /home/avoisio/public_html/zilredloh/wp-blog-header.php(19): require_once('/home/avoisio/p...') #4 /home/avoisio/public_html/zilredloh/index.php(17): require('/home/avoisio/p...') #5 {main} thrown in /home/avoisio/public_html/zilredloh/wp-content/themes/writsy-child/comments.php on line 39