
Firstly, what’s funny is that I really have no fear that my mom will see this blog post and ruin the surprise, that which is her tap pants. My mom relies more on our phone conversations than checking my blog. I think she only reads on a monthly basis, if that. heh
Ahh well… Good for me that I can share my progress with you peeps instead.
My mom’s tap pants have been one of my WIP’s that has been sitting for far too long (while I’ve made 2 hawthorn dresses and 1 Anna dress). What I wanted to work on instead was a second Anna dress… but not wanting to purchase more fabric I decided to work on her much needed PJ set before the summer is out.
Working with silk charmeuse:
I believe this is the first time I’ve officially made a garment with silk charmeuse. It’s a mega shifty fabric and should be handled with caution. While I know I should have purchased some craft paper in order to make a charmeuse sandwich for cutting ease (a la grainline studio)… I didn’t. Instead I sprayed the bejezzus out of it with Sullivan’s fabric stabilizer to crisp it up so I could pin/cut like I usually do.
I drafted the pattern so I could entirely omit the side seams as I didn’t need a side closure due to the fact I was inserting a elastic waistband instead.
After cutting out the tap pants, the first order of business was to hem them.
Narrow Hem:
I have no idea how I figured it out… but sometime early this summer I mastered my narrow hem foot. I’ve used it on cotton and on my silk blend Anna dress (sleeve hems), but this is the first time I’ve used it on the shifty silk charmeuse.
In short, I stitched a line of basting with 1/4″ seam allowances. I press it flat, then I lightly pressed the seam on that 1/4″ seam line in preparation of the narrow hem foot.
I wish I could tell you how I did it… but I just did.

I fed the fabric through the narrow hem foot and stitched it. I had one small mishap area, but nothing too drastic so I just left it as is. Afterwards, I removed the 1/4″ basting stitches and gave it a light pressing.
Lace Inserts:
After hemming the leg opening, it was time for the fancy lace applique.

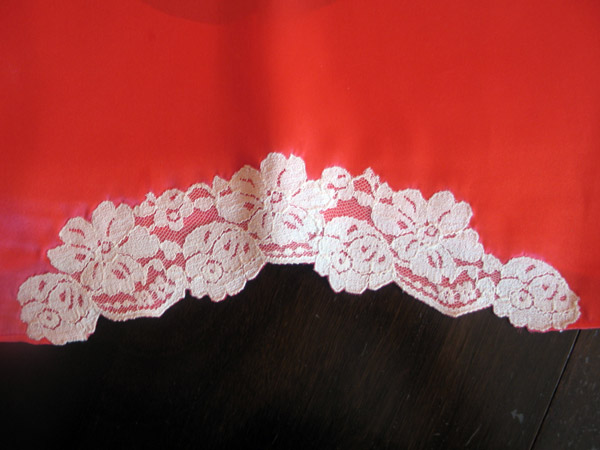
I got this lace as part of a straight lace border from Meg the Grand, when we met up last summer for mini-blogger meetup wherein we swapped, shopped and ate. I carefully cut out the lace trim and basted it to the bottom of each side seam.
What’s difficult to see is that I cut clear through the lace near the center seam in order to create this curved shape. I’ve cut around the main floral motifs and overlapped them to create a lace-applique seam.

The pencil is pointing to the section that I did an applique piecing. You can kinda see that the outline is a bit thicker due to my hand stitching on this area.
From here, I removed the bottom section of silk charmeuse, carefully cutting around the lace. After that I painstakingly hand stitched the lace applique around the raw fabric edge using very small whipstitches. I had to secure the lace while also encasing the raw edge. This took me more than 1 evening.

From here… I let this project sit for a while. I took my sewing machine in to the repair shop and didn’t trust my other machine to stitch on the silk charmeuse without eating it.
Fast forward to now.. my machine is back in top form and I picked up this project once again.
I’m not sure what compelled me, but I decided that time was of the essence and stitched the remainder of the lace applique by machine. I used a very narrow zig-zig stitch at a very short length and carefully worked around the edges of the lace floral motif.
It took me somewhere between 45 minutes to an hour to sew the top edge of the lace. I used the flywheel quite a lot. My forearm was sore the following day.
But now… the lace insets are all complete!
I worry that the zig-zag stitching may be a bit scratchy on the underside, but hoping that once they’re washed once, the stitching will soften up a bit.

From here I stitched the legs shut using a french seam. I have yet to stitch the crotch seam, but I will do so a bit later.

I’m moving on to the camisole next! Wish me luck.
In: Sewing


Fatal error: Uncaught Error: Undefined constant "zilredloh_comments" in /home/avoisio/public_html/zilredloh/wp-content/themes/writsy-child/comments.php:39 Stack trace: #0 /home/avoisio/public_html/zilredloh/wp-includes/comment-template.php(1615): require() #1 /home/avoisio/public_html/zilredloh/wp-content/themes/writsy-child/single.php(40): comments_template() #2 /home/avoisio/public_html/zilredloh/wp-includes/template-loader.php(113): include('/home/avoisio/p...') #3 /home/avoisio/public_html/zilredloh/wp-blog-header.php(19): require_once('/home/avoisio/p...') #4 /home/avoisio/public_html/zilredloh/index.php(17): require('/home/avoisio/p...') #5 {main} thrown in /home/avoisio/public_html/zilredloh/wp-content/themes/writsy-child/comments.php on line 39